 Skip to content

How do you install and mount your Sage Prime thermal mass flow meter? The following post is from the Sage Prime User Manual (Models SIP and SRP) for convenient online access. In any case, to review the most up-to-date manual, we encourage that you visit manuals in our Knowledge Base.
While this post is specific to the Prime, if you want information on another model, please review the specific user manual: Sage Paramount or 200/300 Series.
Install and Mount Sage Flow Meter

Review
-
- The Sage flow meter user must consider the competency requirements of EN 60079-14.
- Check the Certificate of Conformance included with your Sage flow meter for system pressure, temperature, gas composition, power input, and signal output.
Installation Location
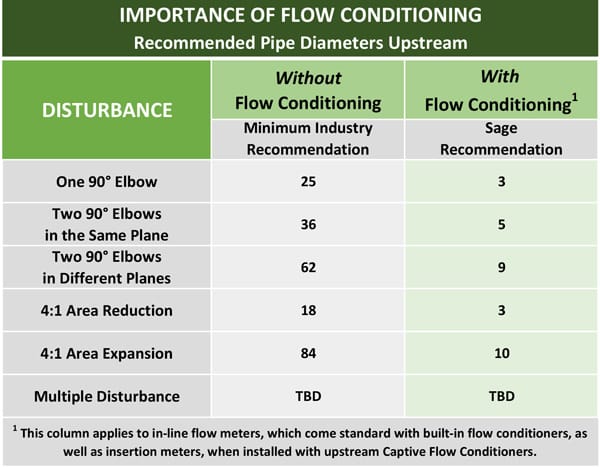
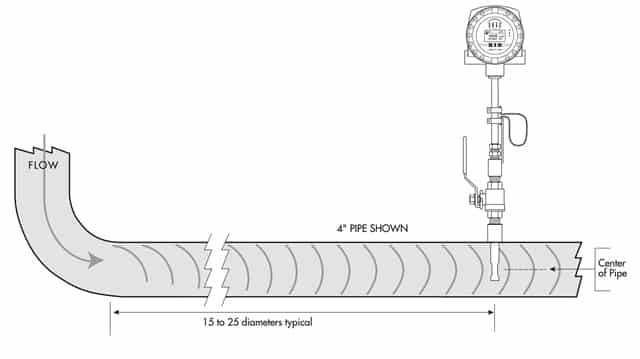
Sage recommends installing your flow meter in a location that has the maximum straight run. We suggest a minimum of 15 pipe diameters of straight run upstream and five diameters downstream, depending on the conditions. Note that obstructions such as valves, blowers, expanders, PVC, and HDPE pipes require additional straight run length. If you do not have an optimum straight run, we recommend reaching out to our Support by sending us a note about your installation.
Meter Orientation
Check the orientation of the meter. The standard calibration flow direction is from left to right when facing the flow meter. An arrow on in-line flow meters marks the gas flow direction, while UPSTREAM is marked on insertion probes.
The integral style, Prime Insertion meter, has the display positioned like the illustration on top. Assuming you have not ordered your meter yet, if a different orientation of the screen or enclosure is required (i.e., installed in a vertical pipe), on the purchase order, please specify “ROTATE” and furnish a sketch or drawing of the desired positioning.
Never rotate the probe, or errors may occur. If the enclosure is facing incorrectly, you can turn it 180˚, but do not rotate the probe. The UPSTREAM mark still needs to be facing Upstream. If, after purchase, you need the enclosure rotated, you can do this in the field. However, if you need to turn the display, the meter must be sent back to Sage for adjustment. Do not try this in the field. Submit an RMA before returning the meter.
To rotate the enclosure:
-
- Clamp the enclosure in a vise with the probe aiming up toward the ceiling.
- Take a 7/8” wrench and turn the probe into the proper position.
- Lock the probe into its new desired position with a set screw.
Hook up System

Hook up the system according to the wiring diagram provided with your Sage flow meter (see inside the rear compartment cover for the terminal designation). Double-check that the wiring is correct for the proper power and signal connections.
Verify that all plumbing and electrical hook-ups agree with OSHA, NFPA, and all other safety requirements.
For Remote Style Meters (SRP), ensure the remote electronics match with the transmitter’s junction box and its probe or flow body. There are serial number tags on both the transmitter and the remote electronics enclosure. Calibration errors will occur if you mismatch the serial numbers of the remote electronics and the junction box.
Wiring Diagrams
Online
-
- Wiring drawings for eight standard Sage Prime models are available in our Knowledge Base.
- Additionally, you may view dimensional drawings for many popular Prime models.
Download User Manuel
-
- Refer to pages 18–22 of the manual for the electrical wiring. Also, there is an illustration in the electronics cover, which shows wiring connections.
- For units with HART, see page 63 for wiring connections.
- Note: Do not open the display side of the enclosure.
If you would like a complete manual, refer to our User Manuals webpage for the most recent versions and download the model that interests you.
Image by Jean-Paul Jandrain from Pixabay
Other topics from the Sage Prime Manual you may be interested in are:
Flow Profile and Installation Considerations for Insertion Flow Meters
Correction Factors for Biogas Variation From Original Calibration